Long time readers may remember the build process of the LoveGrid concept where we designed and finished off the mockup as a static HTML and CSS page. Now let’s take this design and convert it into a WordPress theme. If you want to get your hands on this theme for your own site, it’s now available to Access All Areas over on my graphic design blog – Blog.SpoonGraphics.
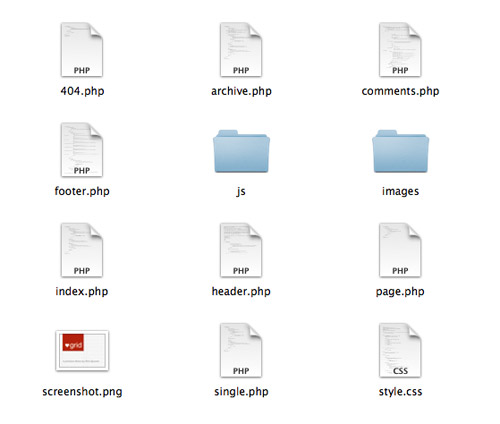
WordPress themes are made up of multiple template files that are all contained in a theme folder. When the index.php file is loaded, PHP tags within this file load other template files, such as the header, sidebar and footer to build a complete page. Different template files are loaded depending on which section the viewer is browsing, so page.php is loaded when the user is viewing a page, and single when the user is viewing a blog post.
Within these template files are template tags, which provide the dynamic functionality of a WordPress blog. Most of these tags are pretty simple and just need inserting in the right place within the HTML code, for instance the
The LoveGrid theme is fairly simple and makes use of just the main template tags. It doesn’t have a sidebar, so sidebar.php isn’t used. Likewise, the search function has been left out to maintain a clean interface, so search.php isn’t required either. When building your theme it’s important to list out the types of template files you will need.
You will also want to add some CSS styling to make sure the alignment of images works. These classes are automatically added by the WordPress WYSIWYG editor:
Finally, don’t forget to modify the screenshot.png image so your theme displays a nice preview in the Appearance section of the WordPress admin area so it can be identified when selecting a theme.
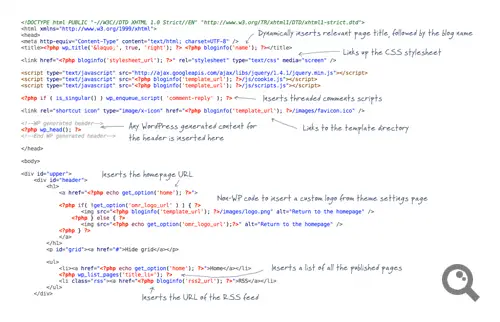
Open up your index.html mockup file and copy the code that makes up the header area. This should include all the elements that will appear exactly the same on every page of the site. Paste them into a header.php file within your theme folder. The next step is to go through and insert WordPress template tags in place of the basic HTML. The first will probably be
Just before the closing
Also included in the header.php file is the header section of the design. Links to the homepage are added using the
Finally, at the end of the navigation list, an extra
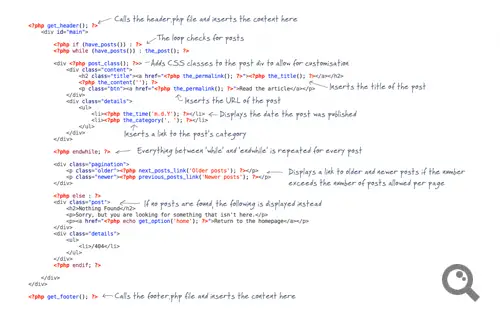
Switch back over to your mockup HTML file and copy the next chunk of code from where the header left off, down to the footer (or sidebar if you have one). This content will be placed in the index.php template file. At the top of this file the first tag you’ll need is
Underneath the list of posts we can set up the pagination options. Simply insert the
At the bottom of the document the footer.php file is called using the
The index.php file is used when viewing the homepage of the blog (unless a page is set as the homepage instead). When the user views a category list or any collection of posts, whether it’s by date, tag or author the archive.php file is used instead. The archive.php file is almost identical to the index, with the addition of a few extra titles to identify what posts the user is browsing.
Conditional tags are used to detemine which snippet of content to display, so
There are two types of content on WordPress blogs, posts and pages. Out of the two pages are often the most simple. The page.php file is pretty much a stripped down version of the index or archive templates. It still includes the link to the header file, the WordPress loop and the tags to generate the page title, but on a page we don’t need a date, read more link, or meta information.

Another template file that acts similar to a page is 404.php. This file allows you to customise an error page just in case a 404 File Not Found error appears on your blog. This file is even more simple that page.php as the content is coded directly without any special WordPress tags.
The single.php file is the template used whenever a blog post is viewed. The first portion of the file is pretty much identical to how the post content is laid out in the other template files, the main difference is blog posts also include comments, so the
Inside the comments.php file there’s a bunch of comment specific tags that enable you to build a thorough comments section.
To finish off the theme, all we need to do is fill out the content in the footer.php file. Remember this file has been called from many of the other template files to round off the page with the rest of the HTML required. The file continues where the others left off. In this particular design the footer file begins with a list of categories using the
Next up in my footer file is a spot of
Another tag you wouldn’t usually see in a theme is
How WordPress themes work
WordPress themes are made up of multiple template files that are all contained in a theme folder. When the index.php file is loaded, PHP tags within this file load other template files, such as the header, sidebar and footer to build a complete page. Different template files are loaded depending on which section the viewer is browsing, so page.php is loaded when the user is viewing a page, and single when the user is viewing a blog post.
Within these template files are template tags, which provide the dynamic functionality of a WordPress blog. Most of these tags are pretty simple and just need inserting in the right place within the HTML code, for instance the
<?php php the_title(); ?> tag inserts the title of that particular post wherever the PHP tag appears in the theme.The LoveGrid theme is fairly simple and makes use of just the main template tags. It doesn’t have a sidebar, so sidebar.php isn’t used. Likewise, the search function has been left out to maintain a clean interface, so search.php isn’t required either. When building your theme it’s important to list out the types of template files you will need.
Getting started
One of the first steps you must remember to take when building your theme is to set up the basic theme information. At the top of your style.css document add and edit the following information:/* Theme Name: LoveGrid Theme URI: http://www.blog.spoongraphics.co.uk/ Description: A premium theme by Chris Spooner of Blog.SpoonGraphics. Version: 1.0 Author: Chris Spooner Author URI: http://www.blog.spoongraphics.co.uk */
.centered {
 display: block;
 margin-left: auto;
 margin-right: auto;
}

.alignright {
 float: right;
 margin-left: 15px;
}

.alignleft {
 float: left;
 margin-right: 15px;
}
Header.php Template File
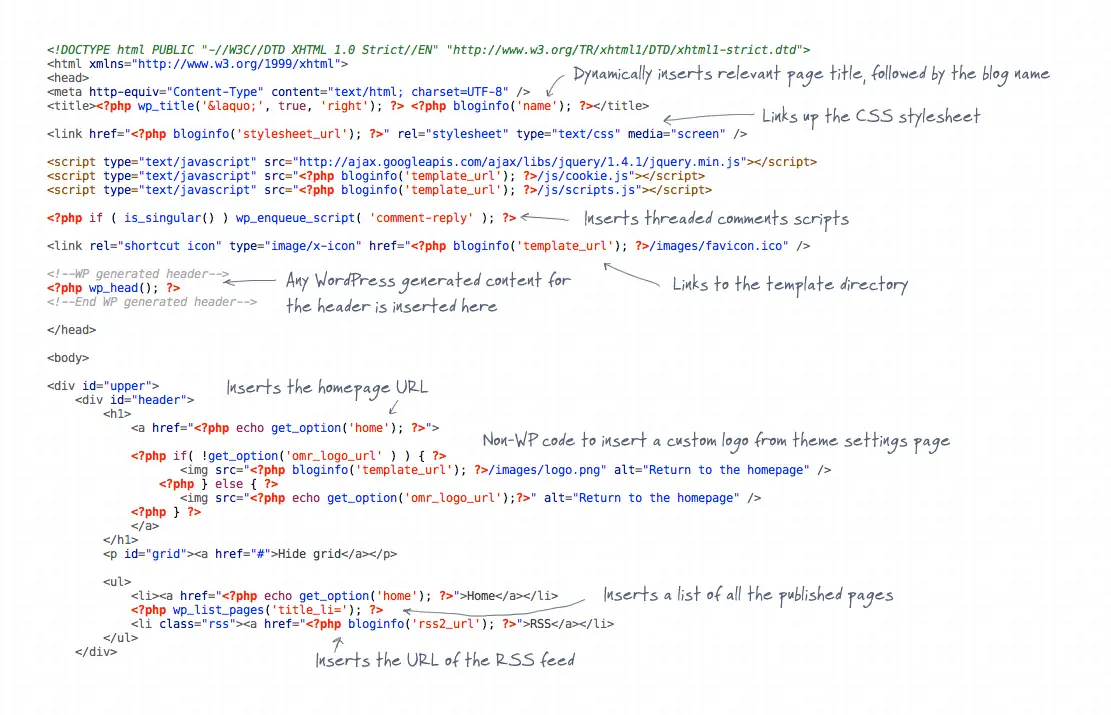
Open up your index.html mockup file and copy the code that makes up the header area. This should include all the elements that will appear exactly the same on every page of the site. Paste them into a header.php file within your theme folder. The next step is to go through and insert WordPress template tags in place of the basic HTML. The first will probably be
<?php wp_title(); ?>, which will insert the relevant wording into your HTML <title> tag for each page of the site. Other tags used in the header template are <?php bloginfo('stylesheet_url'); ?> to automatically insert a link to the style.css file and <?php bloginfo('template_url'); ?> to insert a link to the theme directory, which is handy for linking up Javascript files.Just before the closing
</head> tag, the <?php wp_head(); ?> template tag is used so WordPress can insert any additional code into the head itself, such as meta keywords, description and other plugin specific information.Also included in the header.php file is the header section of the design. Links to the homepage are added using the
<?php echo get_option('home'); ?> template tag. In order to populate the navigation menu, the tag <?php wp_list_pages(); ?> is used to display all the WordPress pages, with the title_li= parameter clearing out the default title that WordPress would otherwise add.Finally, at the end of the navigation list, an extra
<li> is added to link to the RSS feed using the <?php bloginfo('rss2_url'); ?> template tag.Index.php Template File
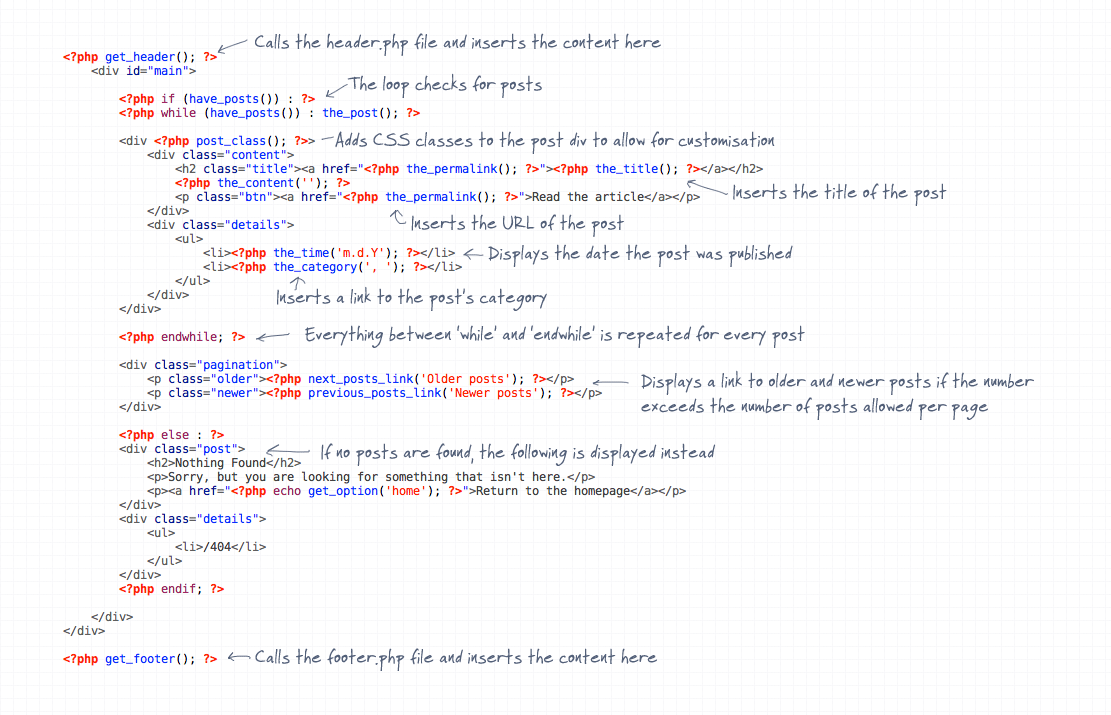
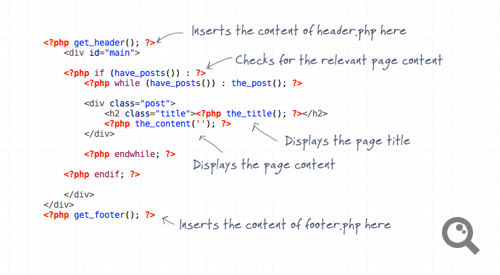
Switch back over to your mockup HTML file and copy the next chunk of code from where the header left off, down to the footer (or sidebar if you have one). This content will be placed in the index.php template file. At the top of this file the first tag you’ll need is
<?php get_header(); ?>, this will insert the content of the header.php file above your index.php content when the page is viewed in a browser. Next, the WordPress loop checks for content. Within the loop you lay out the HTML for one post, then this is repeated for every post WordPress displays. Continue replacing HTML content with a WordPress template tag, so <?php the_permalink(); ?> goes wherever there’s a link to the post, <?php the_title(); ?> goes wherever the post title is displayed and <?php the_content(''); ?> tells WordPress where to insert the actual post content.Underneath the list of posts we can set up the pagination options. Simply insert the
<?php next_posts_link('Older posts'); ?> and <?php previous_posts_link('Newer posts'); ?> tags wherever you want these links to appear. Below this we can set up a simple error if no posts were found below the PHP else statement.At the bottom of the document the footer.php file is called using the
<php get_footer(); ?> template tag. This will render a complete page in the browser by combining the header.php, index.php and footer.php files.Archive.php Template File
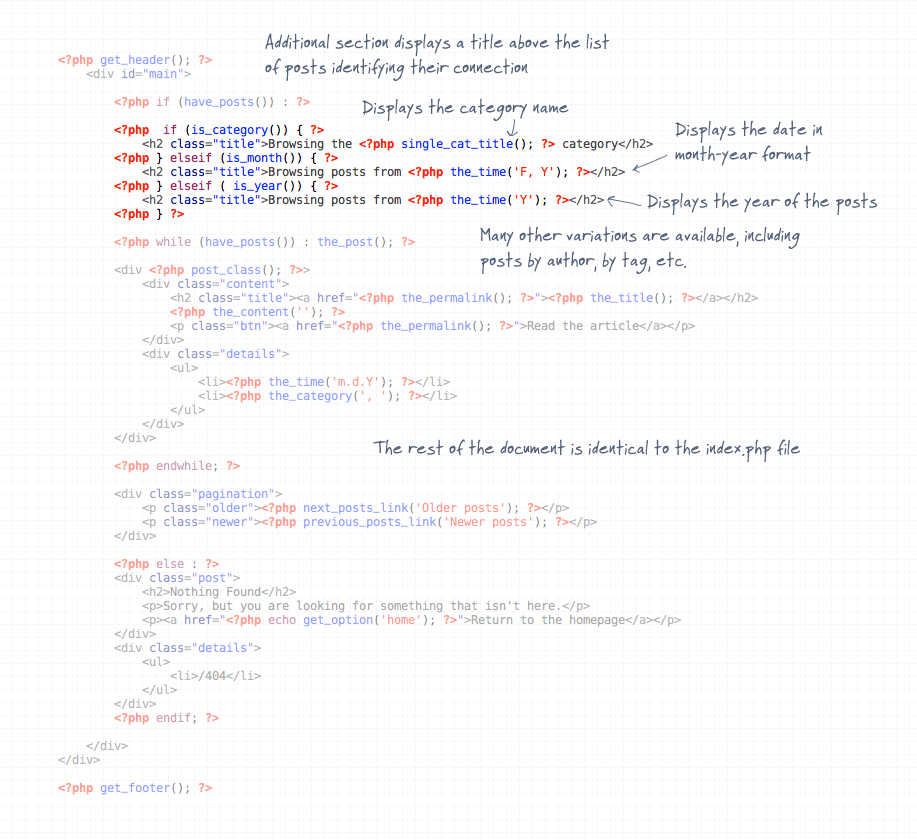
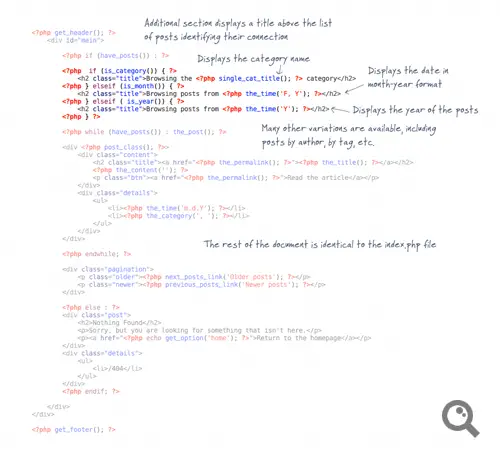
The index.php file is used when viewing the homepage of the blog (unless a page is set as the homepage instead). When the user views a category list or any collection of posts, whether it’s by date, tag or author the archive.php file is used instead. The archive.php file is almost identical to the index, with the addition of a few extra titles to identify what posts the user is browsing.
Conditional tags are used to detemine which snippet of content to display, so
<?php if (is_category()) { ?> checks if it’s a category view. If so, a title is displayed that indicates which category it is, using the <?php single_cat_title(); ?> template tag to print the name of that particular category. Similarly, checks can be made on the date and the relevant month and year can be added to the page. If your site makes use of tags and authors, even more titles can be added using a series of other conditional tags. See the WordPress Codex page on Conditional Tags.Page.php and 404.php Template Files
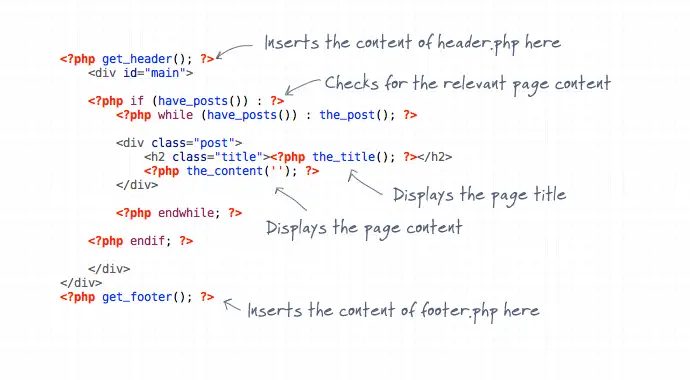
There are two types of content on WordPress blogs, posts and pages. Out of the two pages are often the most simple. The page.php file is pretty much a stripped down version of the index or archive templates. It still includes the link to the header file, the WordPress loop and the tags to generate the page title, but on a page we don’t need a date, read more link, or meta information.
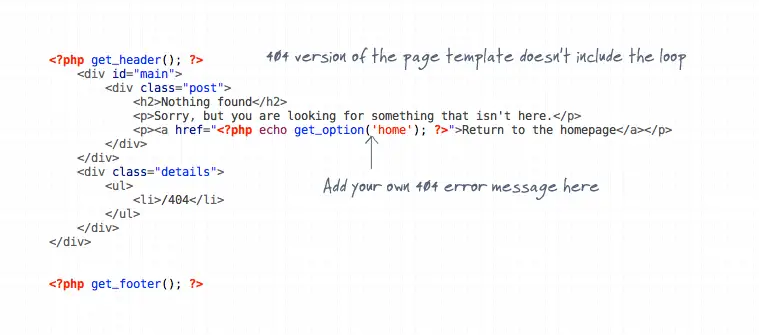
Another template file that acts similar to a page is 404.php. This file allows you to customise an error page just in case a 404 File Not Found error appears on your blog. This file is even more simple that page.php as the content is coded directly without any special WordPress tags.
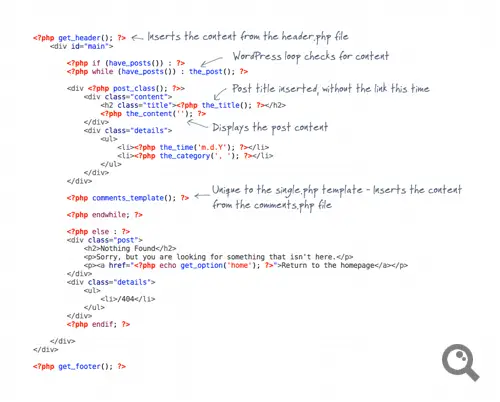
Single.php and Comments.php Template Files

The single.php file is the template used whenever a blog post is viewed. The first portion of the file is pretty much identical to how the post content is laid out in the other template files, the main difference is blog posts also include comments, so the
<?php comments_template(); ?> template tag is used to call the comments.php file.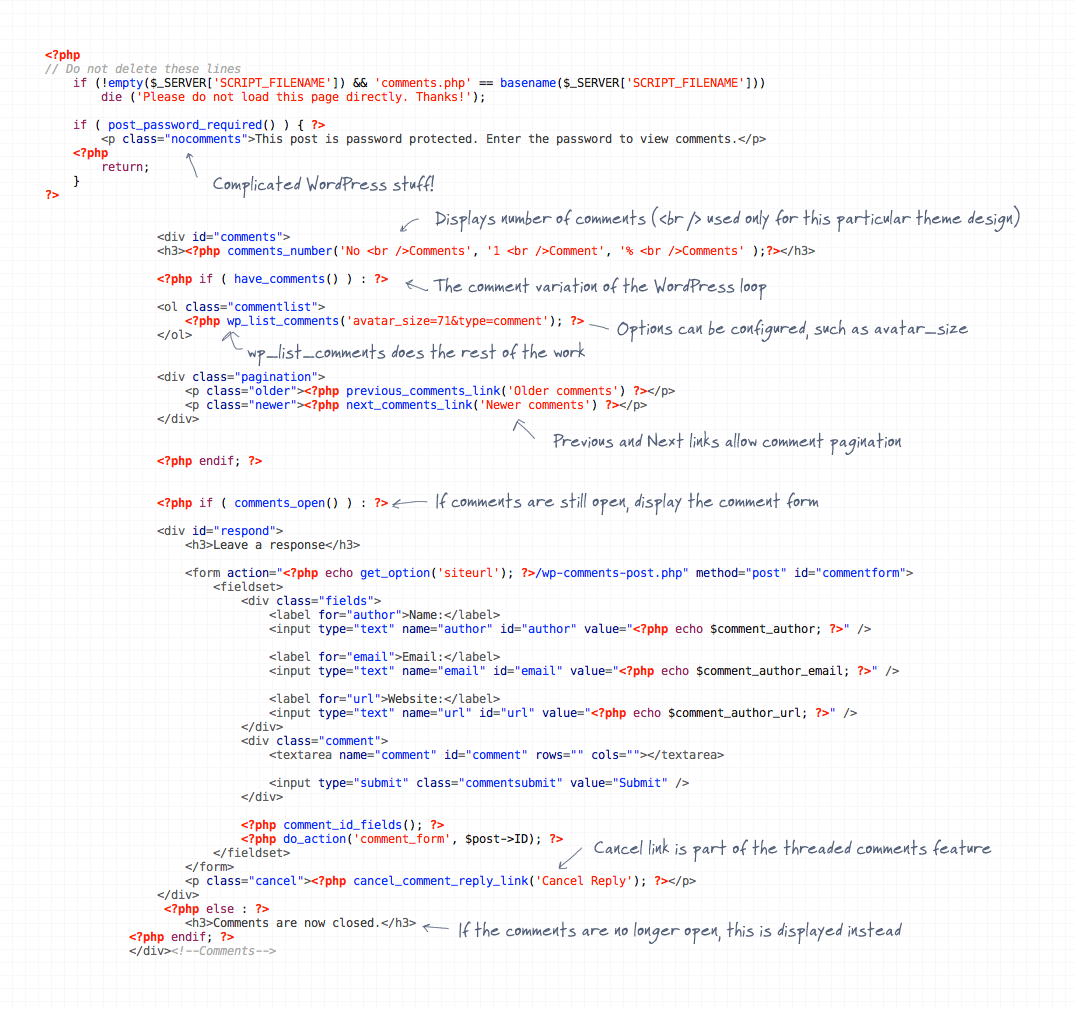
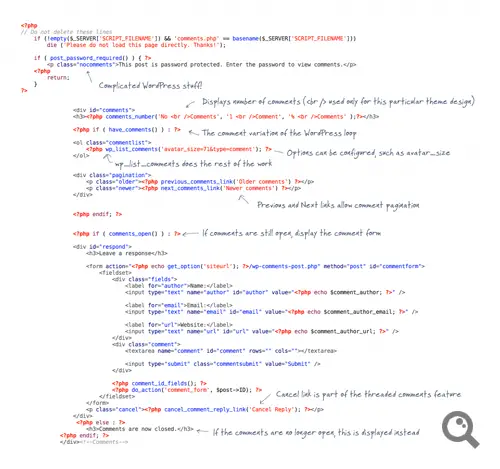
Inside the comments.php file there’s a bunch of comment specific tags that enable you to build a thorough comments section.
<?php comments_number(); ?> is a simple tag used to display the number of comments on a post, with parameters allowing you to edit the wording as you please. The comments file has its own mini loop, <?php if ( have_comments() ) : ?> checks to see if there are any comments on the post, then the whole list of comments is simply inserted using just one tag: <?php wp_list_comments(); ?>. The comments file has its own set of pagination links, which combined with the WordPress discussion settings allow you to split comments over multiple pages.Footer.php Template File
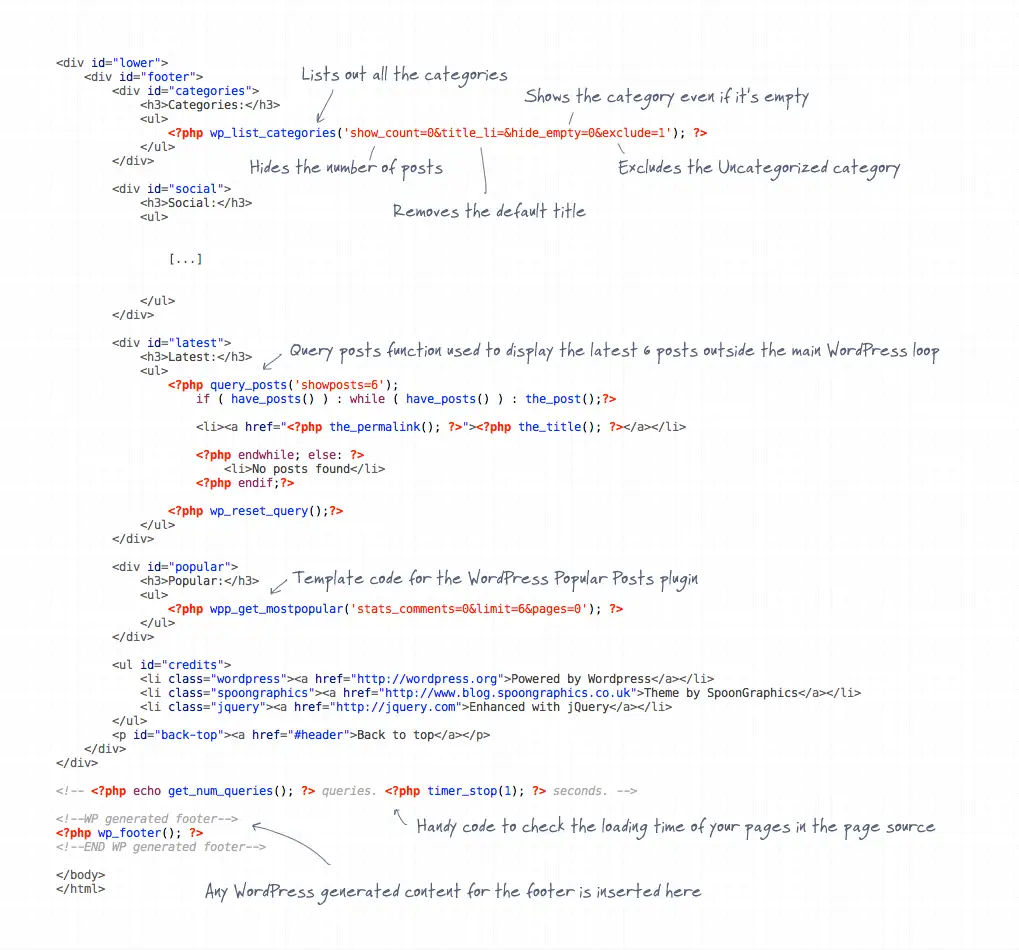
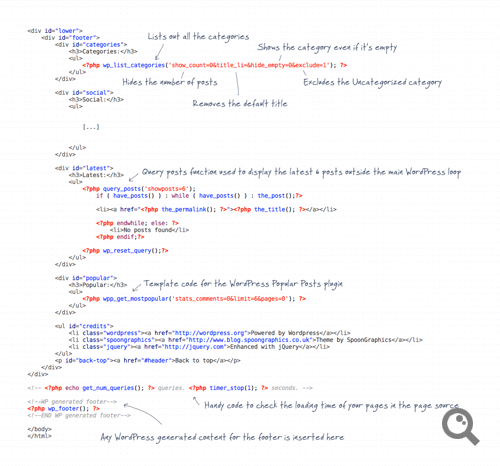
To finish off the theme, all we need to do is fill out the content in the footer.php file. Remember this file has been called from many of the other template files to round off the page with the rest of the HTML required. The file continues where the others left off. In this particular design the footer file begins with a list of categories using the
<?php wp_list_categories(); ?> template tag with a range of parameters clearing out the default post count and title as well as hiding specific categories such as ‘Uncategorized’. Usually this particular template tag would be found in the sidebar, but as with most WordPress tags it doesn’t matter where you place them in your theme.Next up in my footer file is a spot of
<?php query_posts(); ?>. This section isn’t someting usually required in your average theme, but it is used to create a separate list of posts outside the main WordPress loop. In this theme it’s used to display the latest 6 posts.Another tag you wouldn’t usually see in a theme is
<?php wpp_get_mostpopular(); ?>. This particular tag is unique to the WordPress Popular Posts plugin, but it shows how additional functionality can be added using plugins and their custom tags. In the public theme this tag is wrapped in a <?php if (function_exists); ?> statement to ensure it doesn’t break the theme if that particular plugin isn’t installed.